I am still unsure how many of you paint so many pieces of kit at once. This is just the armour pieces for the legs. Not even the inner frame bits, just the armour.
I have arranged them so I know what blocks need to be painted in the different reds and the black.
Once the primer is properly dry I will be putting the colours down. Then I’ll be able to see if I need to do anymore detail work and apply the decals.
I did do some more painting of the frame yesterday, but I’ll leave that update for another time when I have more to show.
Today I thought I’d go back to a little project I haven’t really talked about much, my 3d printed Ladytrooper.
I found the file on Thingiverse , a site that has loads of things to print on a 3d printer. Things from door stops and hooks to movie props and busts. If you can imagine it someone has probably designed one.
I’d seen similar things around and thought they look cool, so I had a look around and found a couple of different ones. This one caught my eye. I downloaded it, and set the printer running.
It came in 3 parts, the base which is designed like a Tie fighter wing. The legs and the upper part. Each took several hours to print and a few more to do some sanding to remove some of the “print lines” that are part of the way the printer works.
After glueing her together I gave her a coat of automotive filler primer. A thicker than usual primer coat that also fills the lines in some more. It does this at the expense of filling in some detail though, so I couldn’t use much. A couple of rounds sanding and priming again got me to a level I was happy with. Well, if I kept going it would lose all the detail….
I decided to go with a traditional stormtrooper armour look, black under white. This did pose a bit of a problem as I had to paint the black first and then the white. So if I messed up and got black where the white needed to be it would be harder to cover it up. So I went carefully. And only stuffed it up a few times. 🙂
The end result is something I’m quite happy with. As a learning experience it was great. Printing your own figures and busts is a cheap way of getting stuff to paint and you can remodel them if you know what you’re doing! The only real expense in 3d printing (after the machine itself) is time. I’m not happy leaving the printer running while I’m not around so it does limit me to prints that can be done in several hours, but there are still more to choose from than I have time to print!
I’ll leave you with the finished product, there is a video about the “build”, but it is a patreon exclusive. You can help support my Modelmaking by becoming a patron here.
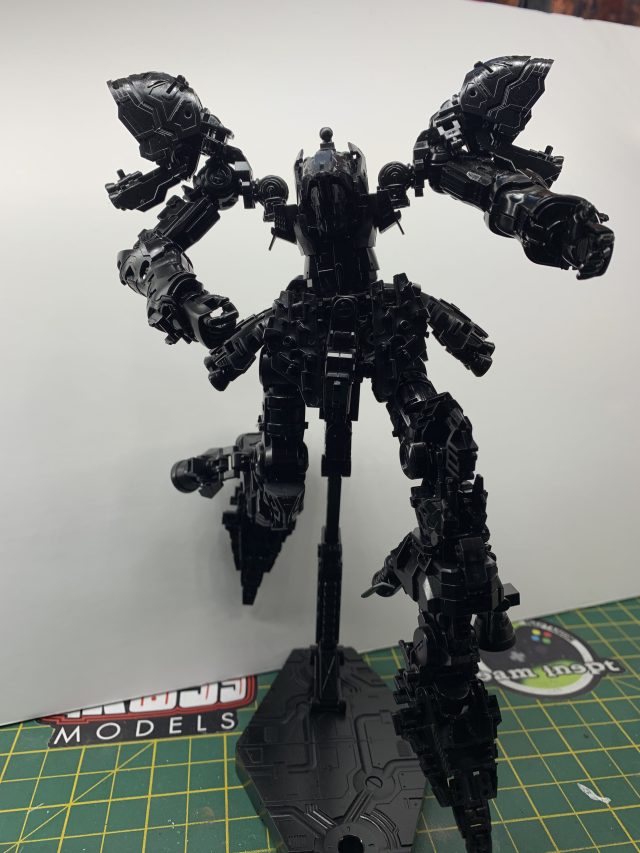
I’ve begun the process of painting the Sazabi, as I like to do with many sci-fi kits I have started with a primer coat of UMP gloss black.
It won’t actually make too much difference what primer I use with the mecha colour paints, as they have such a good coverage that it actually goes over any primer very well with one coat.
Greens over different primers
I intend to do the inner frame in steel, then adding some detail work by brush. I have both dark and light steel for this, as well as some golds and grey.
I’ll be doing the armour panels in the traditional red, but I might well mix up the shades on different panels to the stock version.
Gloss black
Every time I prime a kit in the gloss black I want to leave it as it is. The gloss gives a nice shine, and a lovely deep shadowing. It really brings out the detail in the kit. It’s almost a shame the vast majority of the frame will be covered up!
I have received my first ever pack of upgrade decals.
The RG Sazabi I’m building came with stickers. Don’t get me wrong, stickers have their place, but it isn’t on a nice kit. If you’re snapping together a small, simple model then they are fine to add some detail and colour. But if you’re doing a full paint job on a complex model you want something that properly conforms to the surface and blends in at the edges. Thick stickers just don’t give the same quality finish.
Bandai do lots of kits. The Star Wars range they do is second to none. High detail, great fit of parts, good colours. And they supply BOTH stickers for the “quick job” modeller and waterslide decals for the more “professional “ finish. But gunpla kits? Nope. Stickers. Ohh, we will sell you some water slides. But by the time you’ve added shipping to the cost they are somewhat expensive.
I was pointed towards some decals and went to buy them but for whatever reason they were not for sale in the UK. So I found some others.
Never having bought them separate before I had no idea if they were any good or not. My main criteria was cost and if they would actually supply them to me! It turns out the ones I got are actually quite a good brand.
Now, looking at them next to the stickers, there are notable differences. The most apparent is the fact there are fewer on my new sheet. As you might have imagined, the highly shiny metallic stickers don’t have a waterslide equivalent so I have to decide if I’m going to use them or paint the detail. As I’m going to be painting some detail I will have a look and see where they are meant to go and how they will look.
The Sazabi is completely down to the frame now. All the armour pieces are separated to the different reds and the other colours. I shall start the painting soon….
After completing the build of the Bandai RG Sazabi, I’ve started taking it apart.
As I’d only built one other Real Grade gundam, I wasn’t too sure about the fit, how it should look, the colour, basically most of the build. So I have been assembling it as the instructions show to get a feel for it.
Now it’s all together I can see how the articulation works, the colour separation on the armour, how much of the inner frame is going to be visible, and everything now works perfectly in my mental picture of it. (Yeah, right)
So, time has come to strip him back down.
I’m basically dismembering him and taking the skin off. I hope this post doesn’t get me in trouble……
I started with pulling him apart into the component sections- arms, legs, waist, etc. Then I started the armour removal. I’ve done a leg so far.
A naked leg
I did film the process, and it will become a part of the build series. It’s also there so I can check how it goes back together……
When I’ve got it all apart down to the frame I’ll be priming and painting it, then it will be time to see if I remember how it goes together…..
Don’t forget you can share your work with me, and I’ll show the world!
Post your pictures in the Facebook group and I’ll share them on my Thursday stream. The more pictures I have to show, the less talking I have to do- it’s win/win!
There isn’t a cut off time, just post whenever during the week and chances are I’ll find it. If not you can always shout at me in the chat on Thursday and I’ll track it down.
The little SD Sinanju is almost complete, just the weapons and backpack to assemble. The same is also true for the big RG Sazabi.
The videos of the Sinanju are uploading, the head edition will be available later on today.
The Patreon exclusive Sazabi series. Is up to part 7, which is also to head, and also contains my first ever build of an ‘Action base’ so I can display it in a more interesting pose than “standing up”
Next up for both of them is going to be the backpacks. As ever, the SD is probably 4 bits, and the RG Sazabi will be many, many more.
I build the RG first so I can show how it’s going at the end of the SD video, remember the whole series is available to all of my ‘Gross Geeks’ and above Patreon tiers.
My 1:144 Astray nest to the Sazabi for scale. And the little SD Sinanju.
On the 5th July 2017 I published my first video Gross Models channel. A complete build and paint of the Zvezda Hurricane in 1:144. Of course. It has now had 700 views. I expected about 7.
I hope I have improved over the last 2 years, I do have better equipment for one thing.
Here’s the original. My first video. Be gentle with me.