Wednesday I will be starting my next big Lego build, a massive 3091 piece construction spanning 31+ bags of bits!

Join me from 8pm GMT to find out more and enjoy the build with me!

Modelkits and Partworks: builds, guides and fun!
Wednesday I will be starting my next big Lego build, a massive 3091 piece construction spanning 31+ bags of bits!
Join me from 8pm GMT to find out more and enjoy the build with me!
As the Weirdnob is now completed, I will be starting a new project in the new year.
As before, I thought I’d make my life easy and make you do the work. So I have selected 5 kits for you to choose from.


Go over to my Patreon page to vote! You have until the 1st of January.
If you missed last nights premier, where were you? It was fun! I do occasional premieres on my YouTube channel, it’s always nice to be able to chat to people as they watch for the first time.
The video is still available to watch HERE, although you won’t get any reply if you type anything…..
The video is the first in a new series of making the Warhammer 40k Baneblade. A huge tank thing. Of course I’m not going to paint it in normal, boring colours. As a Warhamster thing it has to be basically orange. And I may have made a mistake in suggesting it would be interesting to have a try at digital camo…..
Keep an eye on my channel for the series, I’ll be releasing videos throughout the build!
As promised, here’s the post about the actual dragon base.

I started the base with red, then swirled in some yellows to give a more organic look.
I built a plastic wall around the outside to hold in the next part: PVA

I layer of pva, probably 5 mm thick. I left this to dry for a day, and got: well, not much change actually. I left it another day and again, not much. I think the pva was drying at the top, and I’d made the wall too well so it wasn’t actually letting any air through at all. I removed the wall, and let it dry for another day…..

Some of the pva was absorbed into the tissue, but I could see obvious signs of drying! I left it again…..

And it worked. I decided to give it a little dry brush of orange, to mix it up a little more.
Then came the interesting bit. Crackle.
This was done on the Warhamster stream, “Slapping it on” and using a hairdryer to dry it quickly.

This was immediately after drying it. I knew from the test piece it would continue to crack some more if left alone, so I did.

That’s the “finished” base. But not quite complete.
Paul did suggest “Object source lighting” on the rock to add a little more realism. As I hadn’t done any of that before, I thought it would be an interesting experience.

It doesn’t show up much in pictures, and isn’t that obvious in person, but I added some red and yellow to the underside of some rocks to imply the light from the lava lighting upwards.
I have a little more touching up to do to the model, but it’s basically done.
Watch on Sunday for the finished dragon, and the start of a new build that my patrons are voting for!
If you’ve been watching my Warhamster streams on sundays, you’ll have seen I’m getting close to finishing the orange dragon. I’ve always intended it to have a base like cracked lava, so I thought I’d better practice.
I am using citadel paints, and they do have a good range of what they call “Technical” paints. These are usually used for effects: things like blood, snow, mud, and some have a special ‘crackle’ property as they dry.
I tried a couple of different ones and decided on Mordant earth as my black lava type top.

I have been told of a method for getting the best crackle, so I followed it and we will see how it comes together.
To begin, you need a good base colour. Obviously for lava that’s going to be red. Over that you need some yellow/ orange to make swirls and a visual texture. The tricky part comes next: PVA. Pva is a white glue, that goes transparent when it dries. It also shrinks quite a lot.


The yellow was just ‘Slapped on’ to see how it could come through. I know lava doesn’t look anything like that.

The next trick I was told about is not to let the technical paint dry on its own. Using a hairdryer to quickly dry it gives more cracks, and makes them bigger.

The thick paint didn’t crack much, so I added a thinner layer (closer to the camera in the picture). I sort of wanted something between the 2 finishes, so I thought I’d have to get the thickness of the paint just right. Except…. when I came back to it the next day something wonderful had happened.
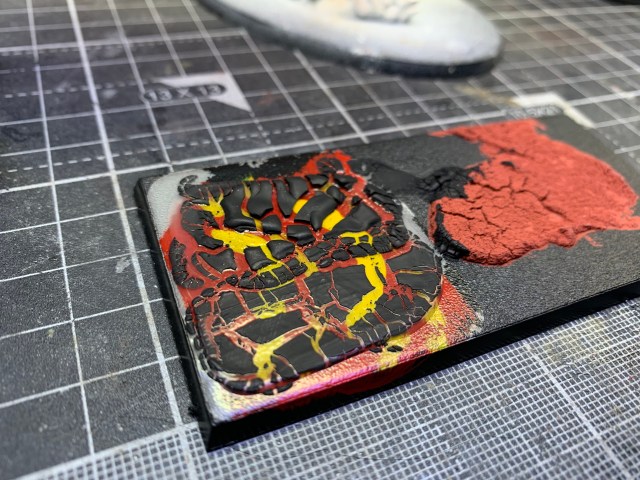
It had continued to crack, getting almost exactly the effect I intended!
I’ll post another page about the actual base shortly. But suffice to say, it didn’t go quite as planned…….
As you may be aware, on a Sunday evening I stream the “Warhamster Late show” where I build and paint Warhammer stuff.
It’s been ongoing for almost a year now, with a flying skiff thing, an orange space tank, 3 parks in armour, a tiny Grot and Squig (don’t ask) all completed. The current project is a lovely bright orange dragon. I don’t know why orange has become the colour of the stream, but we are stuck with it now. 🙂
The stream itself is every Sunday at 8pm UK time and is usually about 90 minutes long. I very rarely do any “behind the scenes” stuff, except priming the kits for painting as that’s hard to do on camera. After the stream has finished the video is archived into a Patreon exclusive playlist, so although anyone can watch live, watching it again or on YouTube is reserved for my patrons. I have to have something a little special for them!
I have got a couple of streams I have left open for all so you can get an idea of what it’s about if you are unable to catch me live, and if you would like to watch something like 60 hours of “Previously on Warhamster” you can always join my Patreon…..
The current progress of the dragon is ‘Almost done’. I still need to do the base and decide if I am doing the rider or not…..
Come watch next Sunday to see how much I get done!
I’ve finally finished the sazabi build! It took me longer than I expected. I did seem to start it well, but then slowed down to a crawl (ok, a stop).
Once I’d finished the build (which I really enjoyed) I seemed to get slowed down with decals and details.
But, I’ve finally completed it. Here’s a small gallery of pictures.


Of course, there is a full build video, actually 13 videos…. but these are only available to my Patrons…. come see if you’d like to help support my work!
Over the last few weeks I’ve been building/ painting the Warhammer dragon kit.
As it’s become a tradition I’ve been painting it in orange. Working for a white primer coat, I added a yellow shade, then a layer of orange. That’s as far as I am at the moment, next is a red highlight to add some depth, and. Some black burnt patches.

Tonight I also detailed the mouth, with a pink internal, red tongue, and various shades to the teeth …..
Next time I’ll be doing the same to the horns and spines.
With the latest delivery of the terminator partwork came the special free gift all the subscribers have been waiting for: The rifle.

All in all it’s very nice. The only metal part is the grip/ trigger, but it has some nice detail in it.
I decided I could make it better though.
First the silencer looking bit had a couple of seam lines that needed to be removed, and it was repainted.
I started the main work with making it look more metallic, using some C1 metalizer powder. This is just polished on and polished off.
I also added some lighter metallic paint to add scratches and wear.
With some Nuln oil to darken down some other areas, I had it looking more realistic and more like the reference pictures I had found.

It could be better, but I’m happy to have improved it from the delivered version.
I may do some more to it when it gets held in his hand, but for now it’s done.
The video is here.
Keep an eye out for more as they are delivered!
Terminator time! I have received the next pack of parts for the Terminator: build the T-800 partwork!
Issue 23 is up now, with 24 tomorrow morning, 25 & 26 following over the days after.
All of the issues and several upgrade and modification videos are all in the Terminator playlist for your viewing convenience.
Watch Issue 23 here.