A day off from my ‘day job’ means I can get to the bench for a while.
Also, I just received the next delivery of the Terminator partwork.
So, here’s issue 19, with the others to follow over the next few days. And I’ve started with the painting of the Sazabi so that will be upcoming for my patrons very soon too!
Today is the 50th anniversary of the moon landing.
Such an impressive achievement even today, it’s hard to imagine how it was managed with technology of the time. Your smartphone has many times more computing power than the entire spaceship had.
Why not spend the day watching my build series of the Apollo V rocket? The playlist is here.
If that’s too much for you, I have done a couple of Lego builds that fit the day, both the Saturn V and the special 50th anniversary Lunar Lander kit. They are I. My “Lego” playlist here.
No more Sazabi to report on, so I thought I’d delve back into the album for something to post about.
As you may know, myself, Foxx and Paul occasionally form together into Team Inept, a computer game playing group that aren’t usually very good. We have played many games both together and separately, one of which is Elite: Dangerous.
I happened upon a 3d printing file of the ship I was flying at the time and thought it would be an interesting mini project.
Printing it out was easy, and I only did some very minimal sanding. Then I tried to replicate the paint job I had on my digital ship. I’m pretty happy with the end results.
Even though I haven’t been brave enough to try to copy the writing…. perhaps someday.
I am still unsure how many of you paint so many pieces of kit at once. This is just the armour pieces for the legs. Not even the inner frame bits, just the armour.
I have arranged them so I know what blocks need to be painted in the different reds and the black.
Once the primer is properly dry I will be putting the colours down. Then I’ll be able to see if I need to do anymore detail work and apply the decals.
I did do some more painting of the frame yesterday, but I’ll leave that update for another time when I have more to show.
Today I thought I’d go back to a little project I haven’t really talked about much, my 3d printed Ladytrooper.
I found the file on Thingiverse , a site that has loads of things to print on a 3d printer. Things from door stops and hooks to movie props and busts. If you can imagine it someone has probably designed one.
I’d seen similar things around and thought they look cool, so I had a look around and found a couple of different ones. This one caught my eye. I downloaded it, and set the printer running.
It came in 3 parts, the base which is designed like a Tie fighter wing. The legs and the upper part. Each took several hours to print and a few more to do some sanding to remove some of the “print lines” that are part of the way the printer works.
After glueing her together I gave her a coat of automotive filler primer. A thicker than usual primer coat that also fills the lines in some more. It does this at the expense of filling in some detail though, so I couldn’t use much. A couple of rounds sanding and priming again got me to a level I was happy with. Well, if I kept going it would lose all the detail….
I decided to go with a traditional stormtrooper armour look, black under white. This did pose a bit of a problem as I had to paint the black first and then the white. So if I messed up and got black where the white needed to be it would be harder to cover it up. So I went carefully. And only stuffed it up a few times. 🙂
The end result is something I’m quite happy with. As a learning experience it was great. Printing your own figures and busts is a cheap way of getting stuff to paint and you can remodel them if you know what you’re doing! The only real expense in 3d printing (after the machine itself) is time. I’m not happy leaving the printer running while I’m not around so it does limit me to prints that can be done in several hours, but there are still more to choose from than I have time to print!
I’ll leave you with the finished product, there is a video about the “build”, but it is a patreon exclusive. You can help support my Modelmaking by becoming a patron here.
I’ve begun the process of painting the Sazabi, as I like to do with many sci-fi kits I have started with a primer coat of UMP gloss black.
It won’t actually make too much difference what primer I use with the mecha colour paints, as they have such a good coverage that it actually goes over any primer very well with one coat.
Greens over different primers
I intend to do the inner frame in steel, then adding some detail work by brush. I have both dark and light steel for this, as well as some golds and grey.
I’ll be doing the armour panels in the traditional red, but I might well mix up the shades on different panels to the stock version.
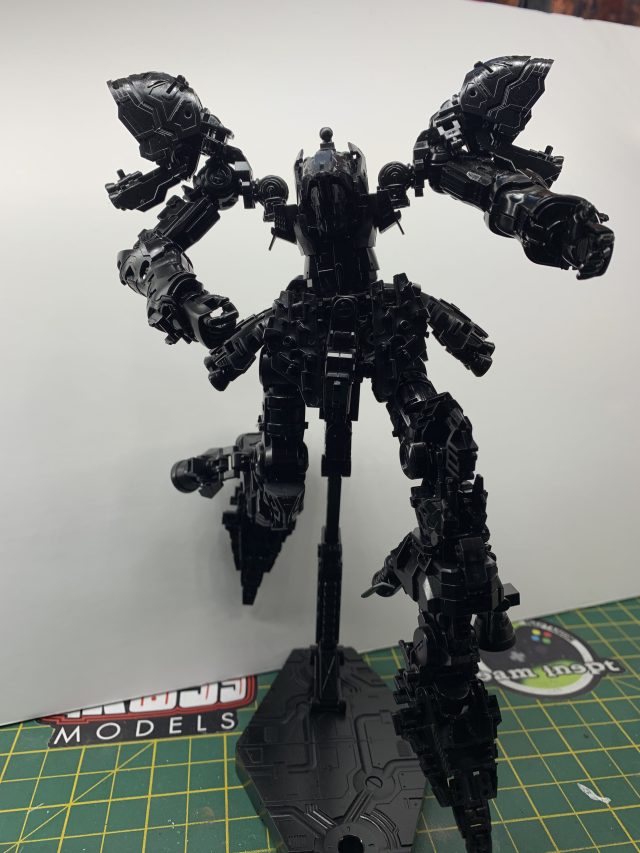
Gloss black
Every time I prime a kit in the gloss black I want to leave it as it is. The gloss gives a nice shine, and a lovely deep shadowing. It really brings out the detail in the kit. It’s almost a shame the vast majority of the frame will be covered up!
I have received my first ever pack of upgrade decals.
The RG Sazabi I’m building came with stickers. Don’t get me wrong, stickers have their place, but it isn’t on a nice kit. If you’re snapping together a small, simple model then they are fine to add some detail and colour. But if you’re doing a full paint job on a complex model you want something that properly conforms to the surface and blends in at the edges. Thick stickers just don’t give the same quality finish.
Bandai do lots of kits. The Star Wars range they do is second to none. High detail, great fit of parts, good colours. And they supply BOTH stickers for the “quick job” modeller and waterslide decals for the more “professional “ finish. But gunpla kits? Nope. Stickers. Ohh, we will sell you some water slides. But by the time you’ve added shipping to the cost they are somewhat expensive.
I was pointed towards some decals and went to buy them but for whatever reason they were not for sale in the UK. So I found some others.
Never having bought them separate before I had no idea if they were any good or not. My main criteria was cost and if they would actually supply them to me! It turns out the ones I got are actually quite a good brand.
Now, looking at them next to the stickers, there are notable differences. The most apparent is the fact there are fewer on my new sheet. As you might have imagined, the highly shiny metallic stickers don’t have a waterslide equivalent so I have to decide if I’m going to use them or paint the detail. As I’m going to be painting some detail I will have a look and see where they are meant to go and how they will look.